

Hello and welcome to a new sewing adventure. This time around it is a zero-waste caftan that I just finished from Liz Haywood’s book “Zero Waste Sewing.” My daughter, Michelle, actually made this pattern first; hence the title, “Mother Like Daughter.”
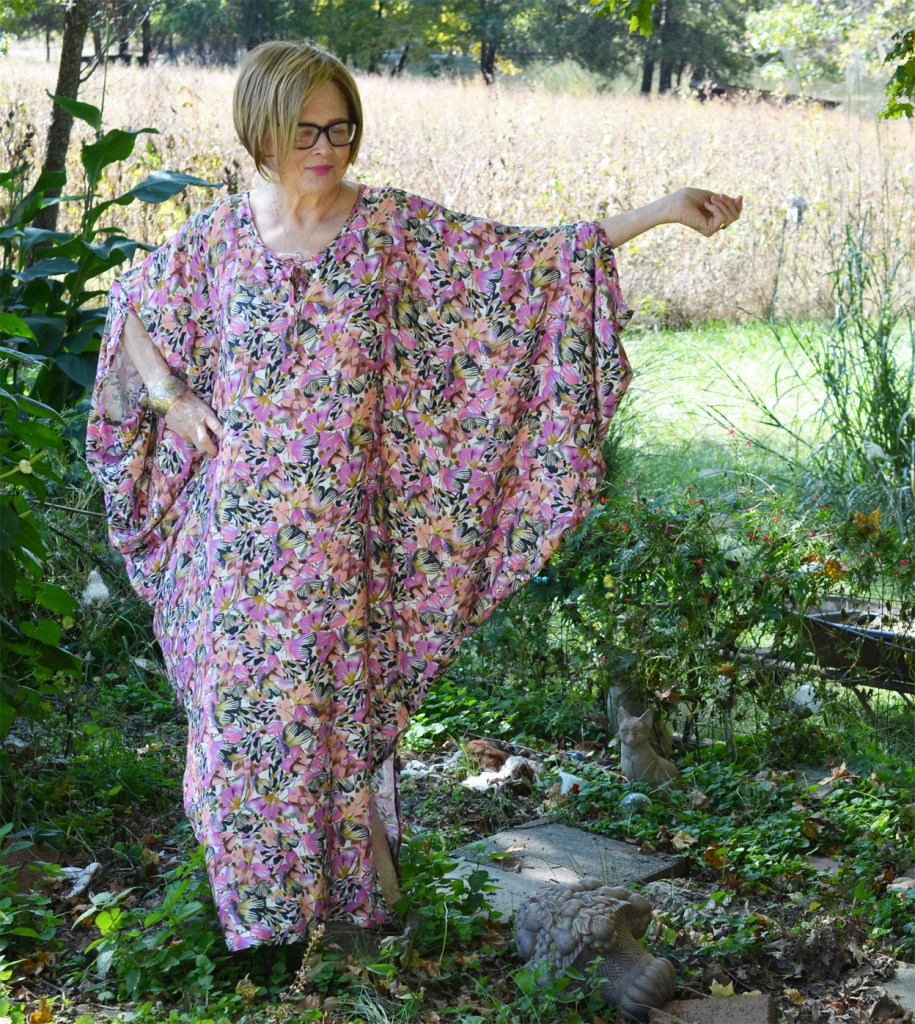
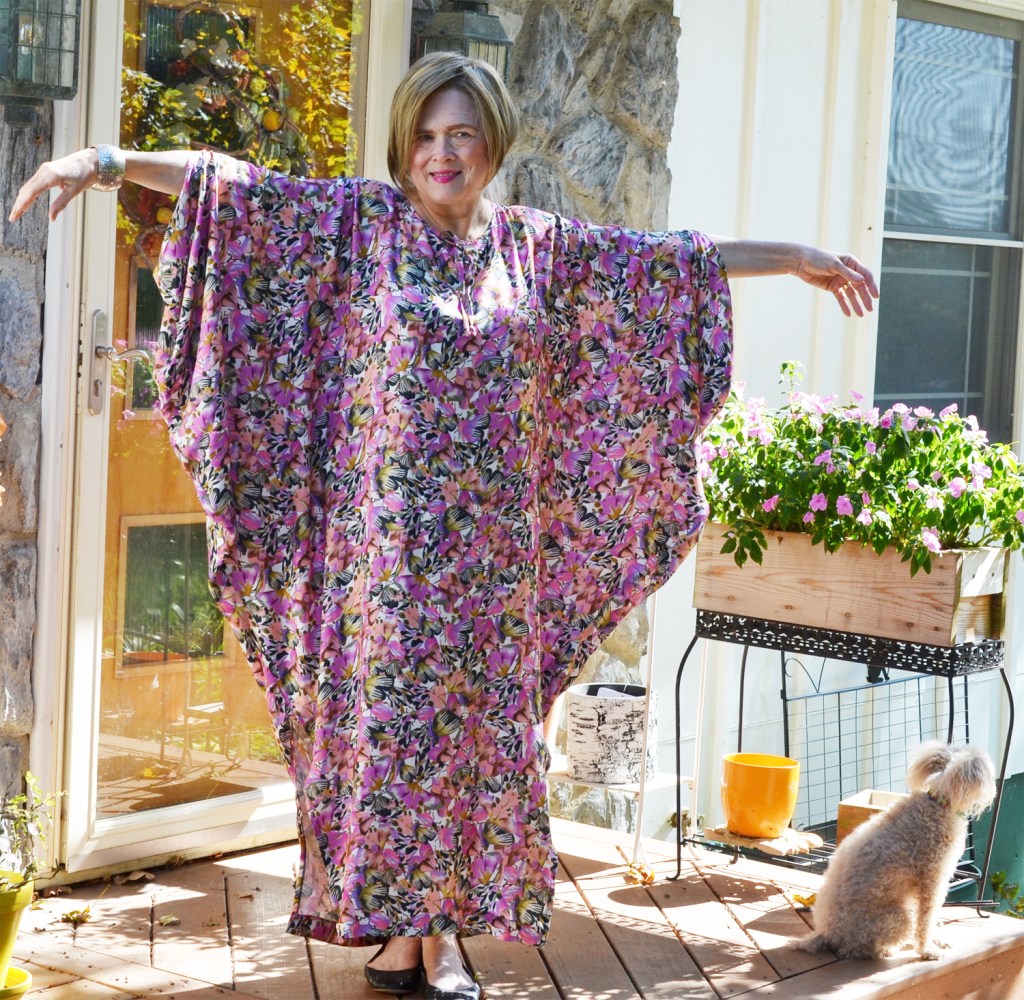
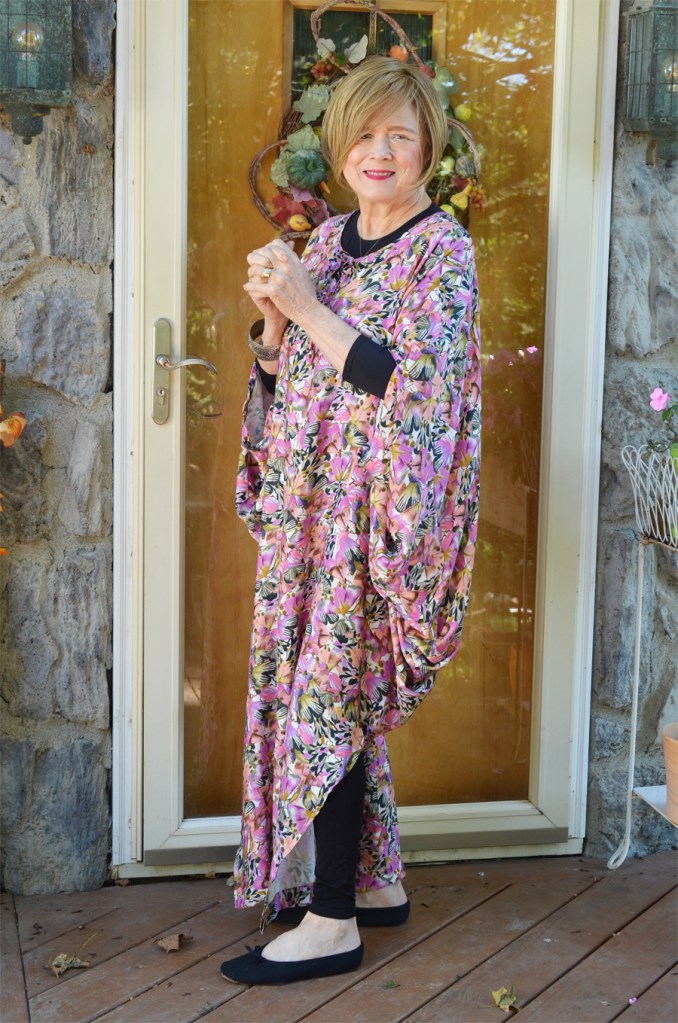
My Caftan
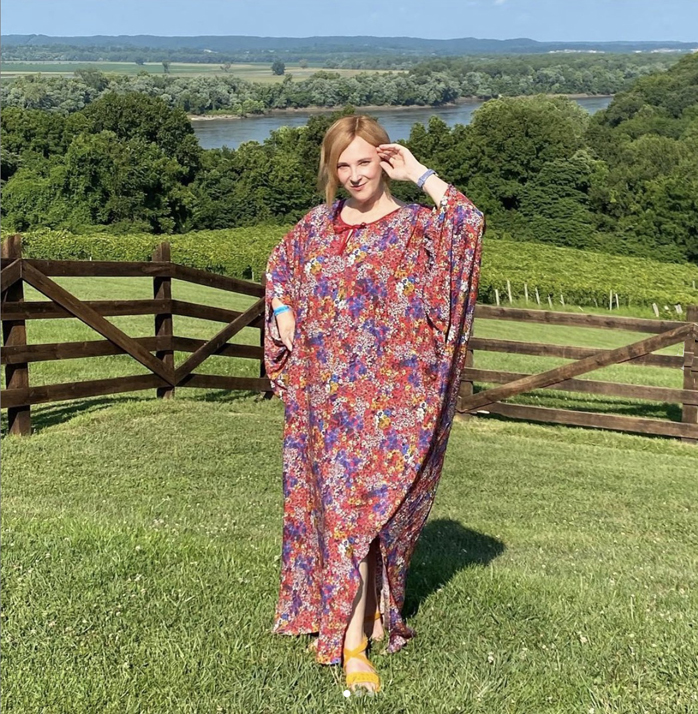
Michelle’s Caftan
A Zero-Waste With a Twist-This Pattern Is a Tessellation
You do have to draft this pattern yourself. As usual, Liz Haywood’s instructions are very clear and straightforward. This project just takes room to do. These are big pieces of paper.
There are many different choices of paper on rolls available. You can get white craft paper or tracing paper. I have a roll of white craft paper that I’ve about used up and I’ve also used freezer paper. This summer I ordered some Bienfang Sketching & Tracing Paper Roll, in white, that is 50 Yards x 36 inches. We’ll see how sturdy the tracing paper is compared to the kraft and freezer paper. It definitely will take up less room.
The pattern-making might take some time. But, taping all those PDF printing sheets together is almost as time-consuming.
I did say that this pattern is based on tessellations. Simply put, a tessellation is a shape that can repeat itself with no leftover space. I’ll talk more about tessellations at the end.
Fabric: Type and Width
Michelle and I both used rayon challis from Mood fabric. My fabric is 100% Viscose and described as a Pink and White Pastel Papillon Rayon Batiste. There are three yards left and it can be found HERE. I ordered three yards but only really needed two and a half. But that did give me some extra fabric to make the strip for binding the neckline and creating the ties, with just a little leftover for some other small project. There are just three yards left of this fabric at Mood-just enough for a caftan!
To make this caftan true zero-waste, the fabric needs to be 60″ wide. This fabric is only 57″, which means I couldn’t make it the length that the pattern called for, but it was long enough for me. I am 5′ 5 1/2″.
That fabric width also meant that I could not snuggle my two pattern pieces right up against each other. I only had to space them 1/2″ away from each other so my garment still was a very low waste project.

Easy Sewing!
After the two pieces are cut out, this caftan is a great beginner project. The first thing I did was serge all the seams with black thread. I’m rather new to serging. I bought a gently used Babylock Evolve with a jet threading system a couple of years ago. I have to admit, after getting over being intimidated by it, I have enjoyed using it.
The next step is sewing the back seam and pressing it open. Then, take the piece that that was cut out for the front neckline, press its edges under and sew it to the inside of the back neckline. This makes for a pretty cool little detail.
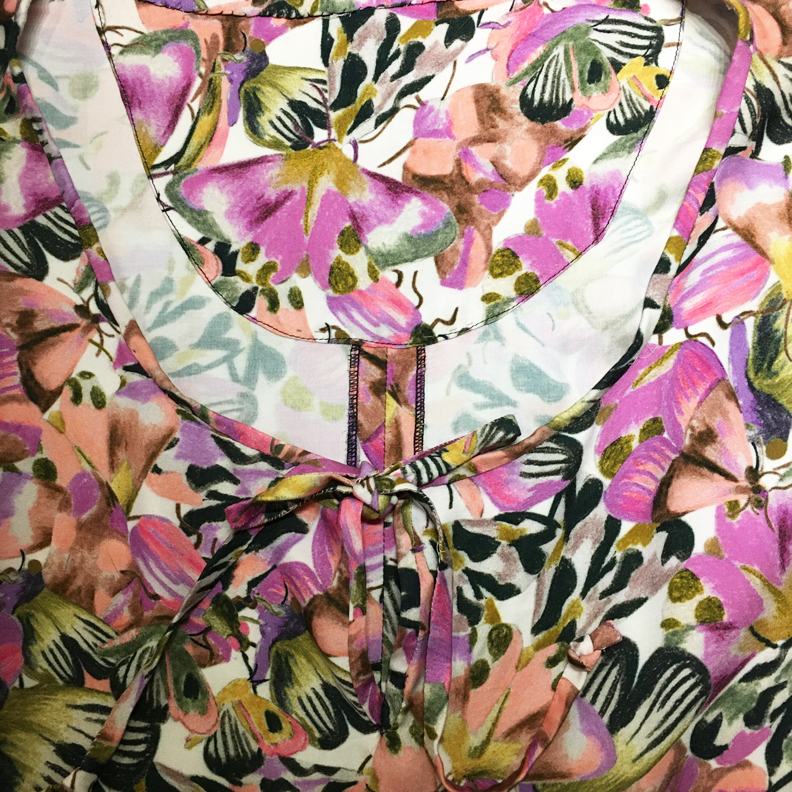
Above, is a close-up of the serged inside edges, the front neckline cutout used as a back-facing, and the binding and ties. I made these ties thin enough where I didn’t see a need for cutting the fabric on the bias, which saved fabric.
Next, it was time to sew up the shoulder seams to the armholes. Yes, the armholes are on at the top! This feature helps to contribute to the cool sleeve drape of the caftan. Then it was time to sew up the side seams down to the point where I decided I wanted my side slits.
This pattern is cut on the cross-grain. For the most part, it did not affect my sewing until it was time to hem the side slits. I found that if I sewed the side hems only from the bottom up, I didn’t get ripples. Michelle also had problems with the side slits trying to ripple when sewn.
Finally, I hemmed my caftan. I didn’t hem front and back evenly. Because of my bust size, I made the front about 1 1/2″ longer than the back (couldn’t make darts). This means that I did have to cut some off the back because I did want my hem seams to be the same width.
Wearing My Caftan When It Gets Cooler
It gets cold where we live and I would like to wear my caftan when the family has breakfast the mornings after Thanksgiving and Christmas. I came up with an idea: just put black leggings and a black microfiber layering shell. I love the look and the black matches the small amount of black in the pattern.
Back To The Pattern Making and Tessellations
It’s hard for me to verbalize what’s going on with this pattern without some type of visual aid. To help, I drew a very rough sketch of the basic idea of Liz Haywood’s design. So here we go……
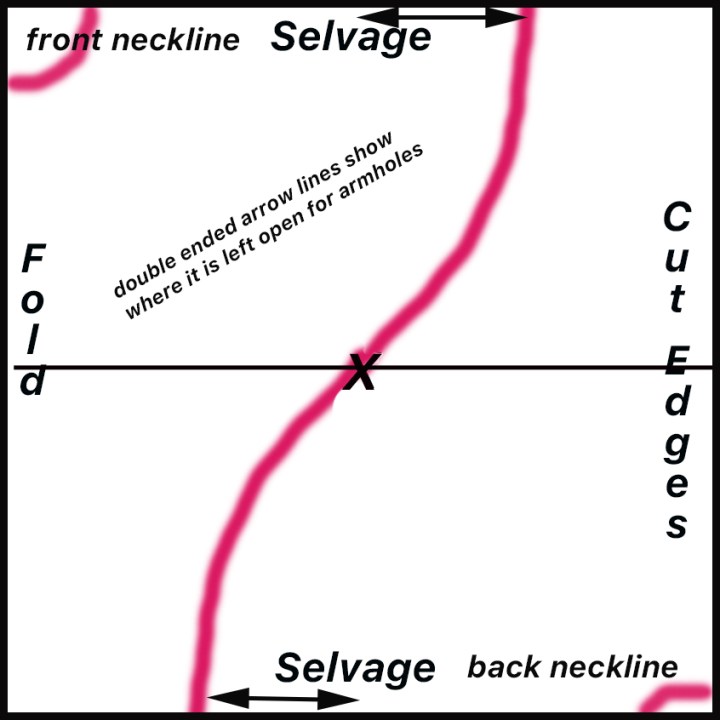
The X marks the center of the square. It is on a horizontal line that divides the square in half horizontally.
The top curved lined (the pink line) is flipped both horizontally and vertically for the bottom half of the pattern. You then have two identical pattern pieces just going in opposite directions and that also fit into a square.
The front neckline is at the top left corner and the bottom neckline is at the bottom right corner.
The double ended arrows mark the armhole openings.
Again, this pattern is cut on the cross grain.
What Is a Tessellation?
Simply put, a tessellation is a pattern that can repeat itself without any leftover spaces. Quilters are very familiar with tessellations as they are used in many quilt patterns.
As far as fine art, M. C. Escher is an artist that is known for complicated tessellated patterns.
Pinterest is full of great ideas for tessellated quilts. I’ve used tessellations when I designed my knitted sweater FLOCK. After designing Flock, I developed and taught an advanced technique knitting and design class called “Tessellation to Intarsia.” All this was back in the early 2000’s when my time was devoted to knitwear design and my Shetland Sheep flock.
I also loved teaching tessellations to my upper elementary before I retired from teaching. There are three basic tessellation techniques that I taught; Slide, Reflection and Rotation. If you want to try some yourself, here is a good 6-8 th grade lesson plan that is very clear in the steps to create a tessellated design. The kids always had fun seeing if they could find any recognizable images after they drew and colored their designs.
If you really want to delve into all the tesselation possibilities, I recommend Designing Tessellations, a book written by Jinny Beyer. It is fairly focused on the quilting arts, However, it has so much valuable information, that I bought it when I was teaching my tessellation classes. This book has been around for a while and can be found used (new it’s $69).
Wrapping it Up
That’s it for me today! I hoped you enjoyed reading about this really interesting concept for a garment. I feel so elegant in this caftan and want to wear it a lot. All the draping just screams elegance to me. I feel like a 1930’s movie siren in it.
I wanted to say a few more words about Liz Haywood. Her pattern line is called The Craft of Clothes and she has more patterns in her shop. This actually is my second post about making one of her designs. The first was her Smith Pinafore, found HERE.
I’m pretty sure I will be making more zero-waste garments. I like sewing patterns that think outside the box.
Take care, everyone and happy seaming!


Love the caftan, especially with the black under it. It should be a big hit at those breakfasts.
Iris
LikeLiked by 1 person
Thank you Iris, I am just glad that the pattern had a little black in it so I can wear my black leggings and top. I figure why not look cool but be comfortable at the same time!
LikeLike
Oh, Terri. This turned out marvelous!!
OXOX
Jodie
http://www.jtouchofstyle.com
LikeLiked by 1 person
Thank you Jodie, I love how it turned out. When I found that fabric on sale at Mood, I immediately knew what to use it for.
LikeLike
Looking rather fabulous! Beautiful fabric, just perfect for those sleeves.
LikeLiked by 1 person
Thank you Liz, I thought fabric with butterflies all over it was perfect for those sleeves. Thank you for coming up with such a ingenious pattern. I was fun to make up.
LikeLiked by 1 person
One more thing I can see my fabric patterns used for!! This is pretty cool, and both of your caftans look great. They must feel amazing.
LikeLiked by 1 person
Yes, I agree, if they are you can get them made in a light weight fabric. I’ll check the samples you gave me. I feel cool and absolutely comfortable at the same time! You like to swish your arms a lot when you are wearing something like this.
LikeLike
Well done, Terri!!! It must be wonderful to wear this caftan in the summer.
Have a lovely weekend, dear.
XOXO Reni
LikeLiked by 1 person
Thank you, Reni. This caftan is perfect for late Spring and Summer. It’s figuring out how to get to wear it during the early winter that has been the challenge, but I think I have that one figured out.
LikeLiked by 1 person
Very nice this caftan, it makes you as charming as Dali’s muse, Marta Marzotto. She often wore these caftans and you are perfect in this particular mîse. 😍😍😍
LikeLiked by 1 person
Oh, thank you very much!
LikeLiked by 1 person
Absolutely gorgeous, Terri! And so is your daughter’s caftan. Zero waste – what a cool way to make a pattern.
Michelle
https://mybijoulifeonline.com
LikeLiked by 1 person
Thank you, Michelle. This is the second zero-low waste item I’ve made. It’s very satisfying.
LikeLike